티스토리 뷰
목차
AWS X-Ray Console, Spring Boot 코드 구현, 데몬 설치 및 실행을 통한 AWS X-Ray에 수집된 데이터를 확인하는 방법에 대해서 설명하도록 하겠습니다.
AWS X-Ray Console 시작하기
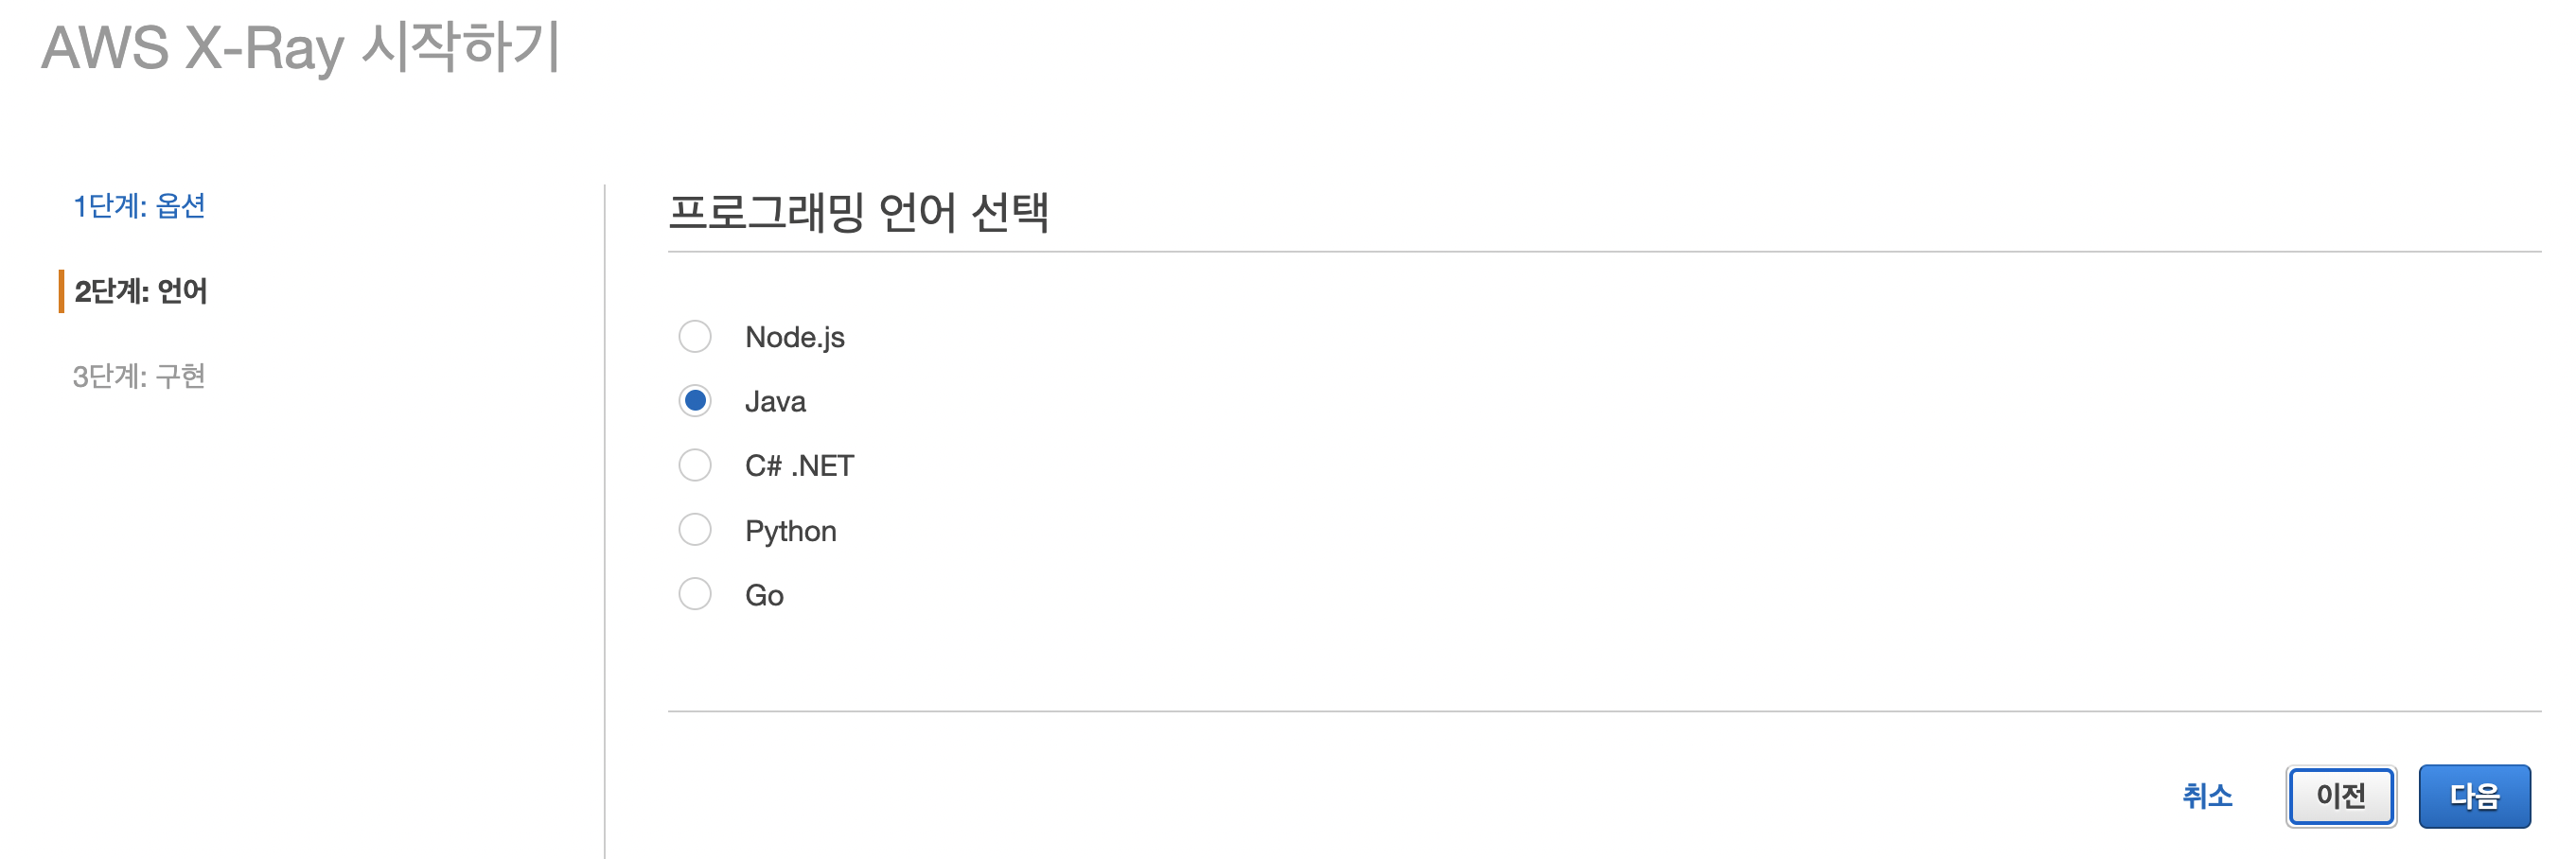
먼저 AWS 웹사이트에 X-Ray 콘솔로 들어가 아래와 같이 선택을 하여 다음을 눌러줍니다.
( 저는 Spring Boot 애플리케이션으로 테스트하였습니다. )


의존성 설정하기
아래와 같이 5개의 의존성울 추가하였습니다( maven 기준 )
<dependencyManagement>
  <dependencies>
    <dependency>
      <groupId>com.amazonaws</groupId>
      <artifactId>aws-xray-recorder-sdk-bom</artifactId>
      <version>2.11.0</version>
      <type>pom</type>
      <scope>import</scope>
    </dependency>
  </dependencies>
</dependencyManagement>
<dependencies>
  <dependency>
    <groupId>com.amazonaws</groupId>
    <artifactId>aws-xray-recorder-sdk-core</artifactId>
  </dependency>
  <dependency>
    <groupId>com.amazonaws</groupId>
    <artifactId>aws-xray-recorder-sdk-apache-http</artifactId>
  </dependency>
  <dependency>
    <groupId>com.amazonaws</groupId>
    <artifactId>aws-xray-recorder-sdk-aws-sdk</artifactId>
  </dependency>
  <dependency>
    <groupId>com.amazonaws</groupId>
    <artifactId>aws-xray-recorder-sdk-aws-sdk-instrumentor</artifactId>
  </dependency>
  <dependency>
    <groupId>com.amazonaws</groupId>
    <artifactId>aws-xray-recorder-sdk-sql-mysql</artifactId>
  </dependency>
</dependencies>
각 의존성은 아래와 같은 기능을 사용하기 위해 추가되었습니다.
- aws-xray-recorder-sdk-core : 세그먼트를 만들고 전달하기 위한 기본 기능( AWSXrayServletFilter를 포함 )
- aws-xray-recorder-sdk-aws-sdk, aws-xray-recorder-sdk-aws-sdk-instrumentor : aws sdk에 의해 AWS service들에 호출하는 내용을 trace( 모든 호출을 trace 하지 않고, 선택적으로 trace를 하려면 이 instrumentor dependency를 제외하고, trace 하고자 하는 모듈에 XRayClient를 TracingHandler로 추가하면 됩니다. )
- aws-xray-recorder-sdk-aws-sdk-apache-http : Apache HTTP Client에서 생성하는 outbound HTTP calls을 trace
- aws-xray-recorder-sdk-spring : Spring AOP Framework를 사용하여 세부 로직에 대한 subsegment를 생성하여 trace
- aws-xray-recorder-sdk-sql-mysql : JDBC로 MySQL 호출을 trace
Incoming Requests 추적
애플리케이션을 호출하는 요청을 추적할 수 있도록 서블렛필터를 빈으로 등록합니다.
package app.metatron.segment.config;

import org.springframework.context.annotation.Bean;
import org.springframework.context.annotation.Configuration;
import com.amazonaws.xray.javax.servlet.AWSXRayServletFilter;

import javax.servlet.Filter;

@Configuration
public class WebConfig {

    @Bean
    public Filter TracingFilter(){
        return new AWSXRayServletFilter("Scorekeep");
    }
}
Outgoing Http calls 추적
애플리케이션에서 외부로 호출하는 요청을 추적하기 위해 기존에 사용하던 apache http 클래스를 xray에 있는 클래스로 교체를 합니다.
com.amazonaws.xray.proxies.apache.http.DefaultHttpClient
//org.apache.http.impl.client.DefaultHttpClient

com.amazonaws.xray.proxies.apache.http.HttpClientBuilder
//org.apache.http.impl.client.HttpClientBuilder
SQL Queries 추적( MySQL )
properties 파일에 jdbc-interceptor에 xray의 Interceptor를 설정해줍니다.( application.yaml )
spring:
  datasource:
    jdbc-interceptors: com.amazonaws.xray.sql.mysql.TracingInterceptor
참고로, jdbc-interceptors는 JPA의 tomcat CP 의 경우에만 적용이 됩니다.
현재 공식적으로 hikariCP의 경우, SQL 추적 기능을 지원하지 않습니다.
hikariCP에서는 jdbc-interceptor 속성을 제공하지 않아 그런것 같습니다.( Spring Boot CP에 대한 포스팅 )
비공식적으로 github을 보면 TracingDataSource 라는 것으로 구현이 가능한 것 같은데, 추후에 적용해볼 예정입니다.( github 이슈 링크 )
예외 무시하기
위의 코드까지 작성을 하고 애플리케이션을 실행하면, 스프링부트의 경우에는 멀티스레드 애플리케이션이어서 아래와 같은 context 예외가 발생을 합니다. ( SegmentNotFoundException )
ERROR [-] [RMI TCP Connection(1)-192.168.0.54] c.a.x.s.LogErrorContextMissingStrategy : Suppressing AWS X-Ray context missing exception (SegmentNotFoundException): Failed to begin subsegment named 'segment@localhost': segment cannot be found.예외를 무시하고 로그에 출력만 하도록 아래와 같이 static 블록에 contextMissing 정책을 적용해줍니다.
( 로그 출력도 하지 않으려면 IgnoreErrorContextMissingStrategy를 적용해주면 됩니다. )
이제 다시 애플리케이션을 실행하면, X-Ray 데이터를 생성하는 준비까지 완료되었습니다.
public class WebConfig {

    static {
        AWSXRayRecorderBuilder builder = AWSXRayRecorderBuilder.standard();

        builder.withContextMissingStrategy(new LogErrorContextMissingStrategy());
        AWSXRay.setGlobalRecorder(builder.build());
    }
}
데몬 설치 및 실행
이제 애플리케이션에서 생성한 X-Ray 데이터를 AWS의 X-ray에 전송하는 역할을 하는 X-ray 데몬을 설치 및 실행해보겠습니다.
EC2( Linux )에서 아래 스크립트를 수행하면 xray 데몬을 다운로드, 설치 및 실행을 합니다.
#!/bin/bash
curl https://s3.us-east-2.amazonaws.com/aws-xray-assets.us-east-2/xray-daemon/aws-xray-daemon-3.x.rpm -o /home/ec2-user/xray.rpm
yum install -y /home/ec2-user/xray.rpm
아래와 같이 확인해보면, 실행이 되어 2000포트로 데이터 수신을 기다리고 있습니다.
$ ps -ef | grep 'xray'
xray     36666     1  0 Mar18 ?        00:00:33 /usr/bin/xray -f /var/log/xray/xray.log
$ tail -f /var/log/xray/xray.log
2022-03-18T10:27:25+09:00 [Info] Initializing AWS X-Ray daemon 3.3.3
2022-03-18T10:27:25+09:00 [Info] Using buffer memory limit of 154 MB
2022-03-18T10:27:25+09:00 [Info] 2464 segment buffers allocated
2022-03-18T10:27:25+09:00 [Info] Using region: ap-northeast-2
2022-03-18T10:27:25+09:00 [Info] HTTP Proxy server using X-Ray Endpoint : https://xray.ap-northeast-2.amazonaws.com
2022-03-18T10:27:25+09:00 [Info] Starting proxy http server on 127.0.0.1:2000
참고로 맥의 경우에는 데몬을 직접 다운로드하여 압축을 풀고 실행해주면 됩니다.( 설명 참조 )
➜  ~ cd ~/Downloads/aws-xray-daemon-macos-3.x
➜  aws-xray-daemon-macos-3.x ./xray_mac -o -n ap-northeast-2
2022-03-11T09:22:07+09:00 [Info] Initializing AWS X-Ray daemon 3.3.3
2022-03-11T09:22:07+09:00 [Info] Using buffer memory limit of 163 MB
2022-03-11T09:22:07+09:00 [Info] 2608 segment buffers allocated
2022-03-11T09:22:07+09:00 [Info] Using region: ap-northeast-2
2022-03-11T09:22:07+09:00 [Info] HTTP Proxy server using X-Ray Endpoint : https://xray.ap-northeast-2.amazonaws.com
2022-03-11T09:22:07+09:00 [Info] Starting proxy http server on 127.0.0.1:2000
X-Ray 콘솔 데이터 확인
자 이제 X-Ray 데이터를 생성하고 전달할 준비가 모두 완료되었습니다.
이제 애플리케이션에 Http 요청을 하면 데몬에서 아래와 같이 로그가 발생합니다.
segment( 수집 데이터 ) 정보를 데몬에서 잘 전달했다는 로그입니다.
2022-03-15T13:02:16+09:00 [Info] Successfully sent batch of 1 segments (0.028 seconds)
2022-03-15T13:02:17+09:00 [Info] Successfully sent batch of 2 segments (0.018 seconds)
2022-03-15T13:24:21+09:00 [Info] Successfully sent batch of 1 segments (0.022 seconds)
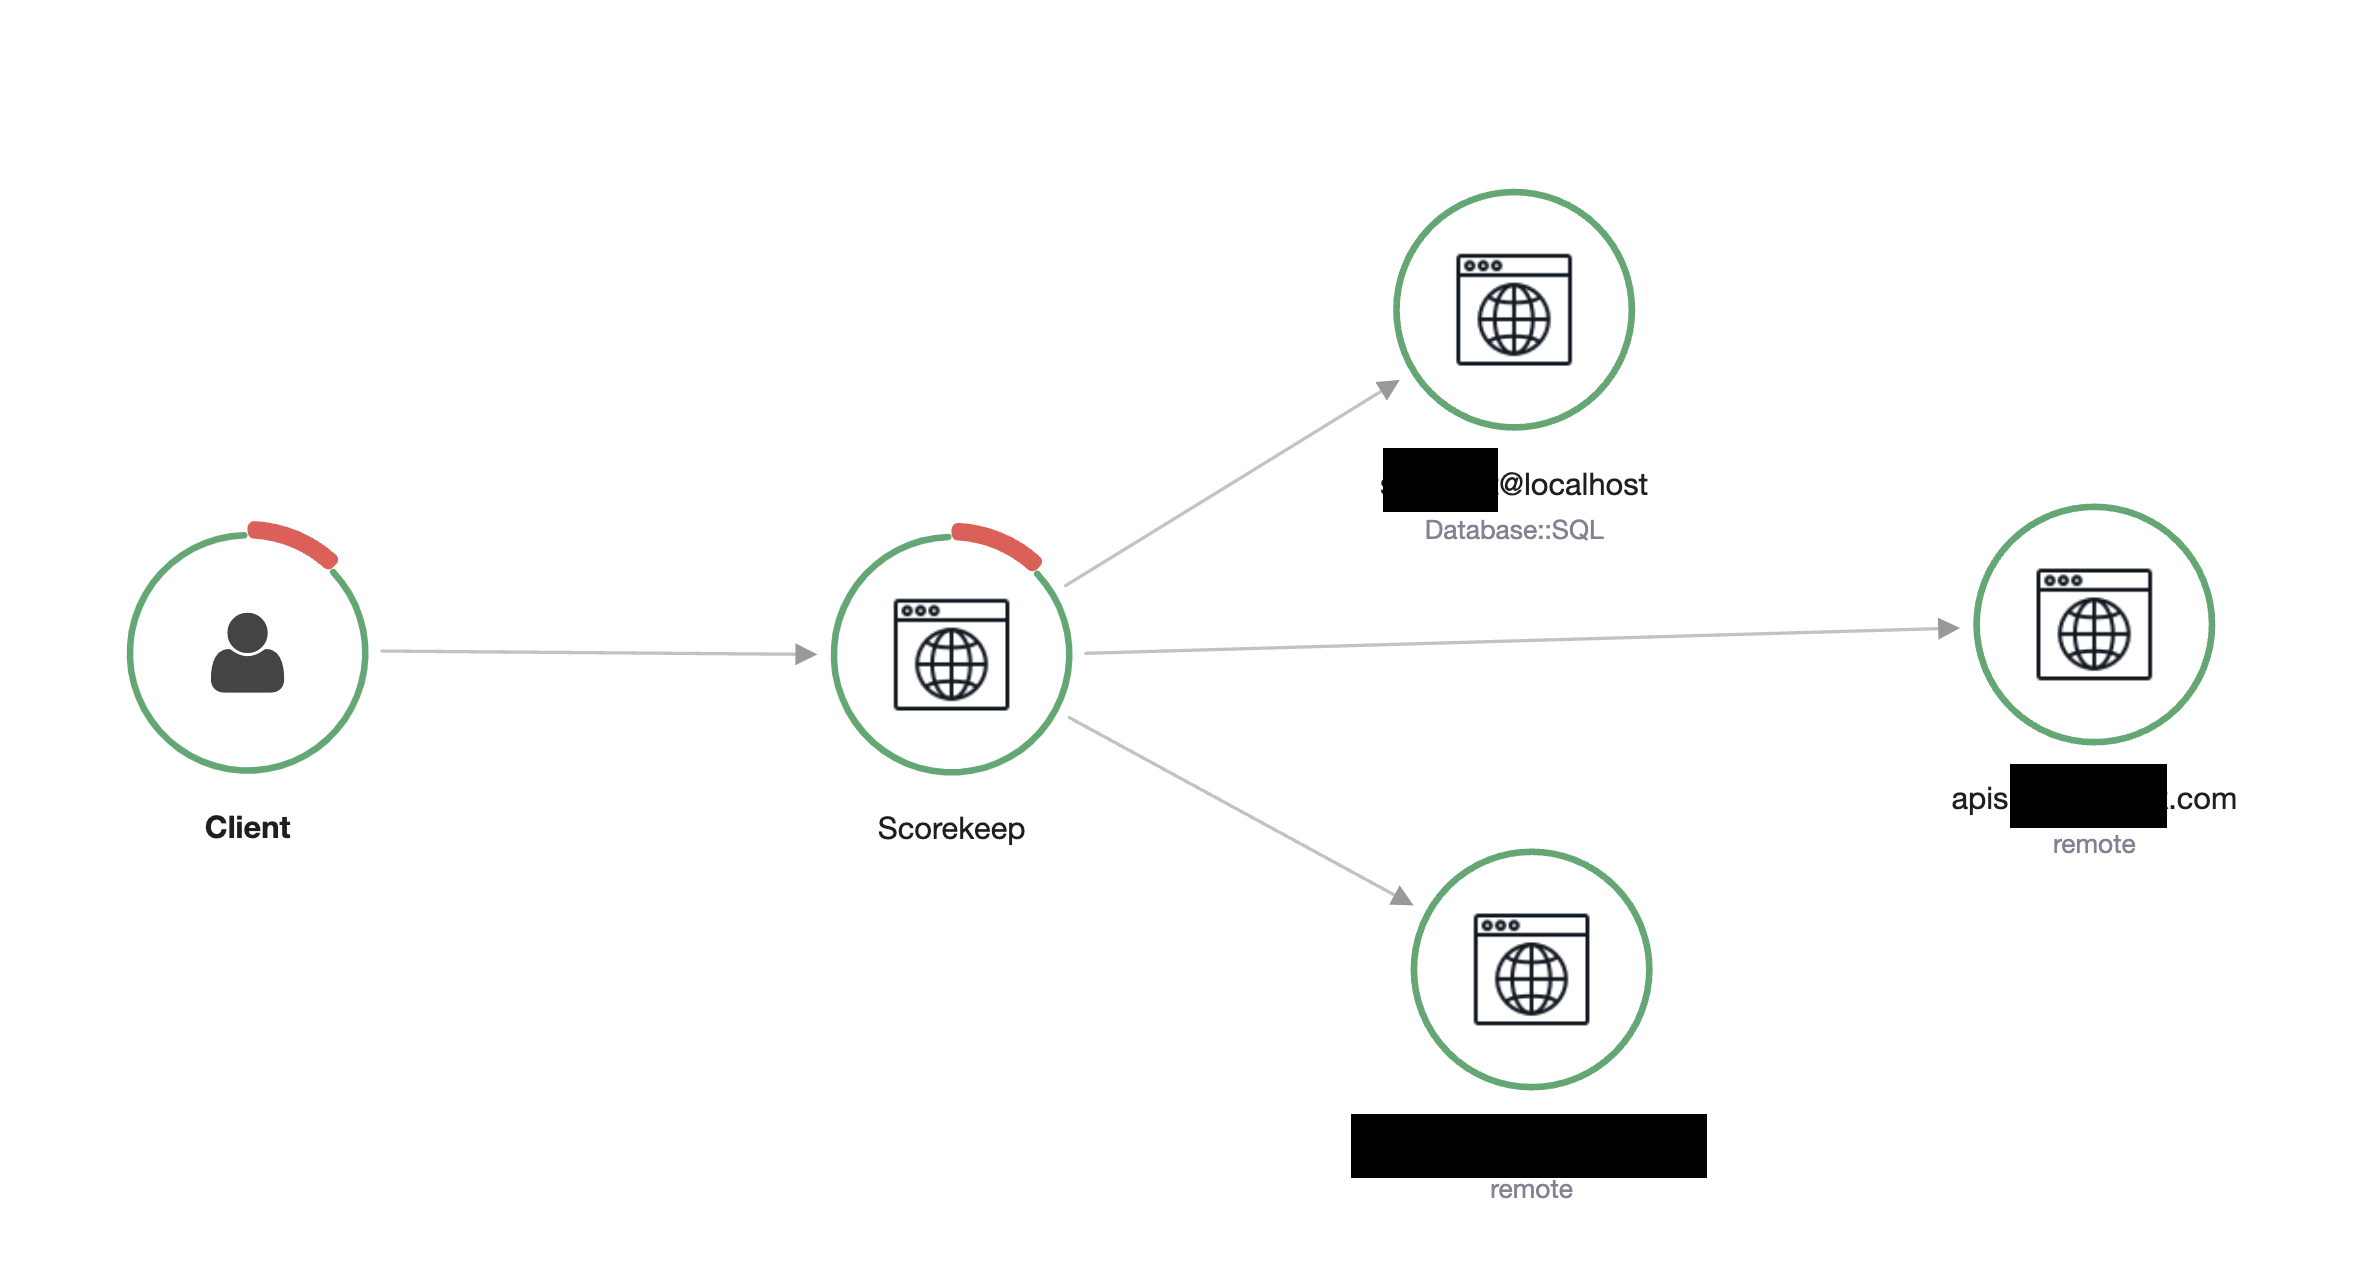
AWS X-Ray 콘솔의 "서비스 맵"에 들어가면 애플리케이션을 중심으로 들어오는 요청과 외부로 나가는 요청이 그림으로 표현이 됩니다.

Scorekeep이라고 되어 있는 부분이 애플리케이션이며, JDBC를 통한 MySQL로 쿼리 호출하는 부분은 Database::SQL로 기타 외부 서비스로 HTTP 호출하는 부분은 remote로 표현이 됩니다.
'Cloud Platform > AWS' 카테고리의 다른 글
| EC2에 AWS X-Ray 적용하기 (3) - Customize SQL, Segment (0) | 2022.03.24 |
|---|---|
| EC2에 AWS X-Ray 적용하기 (2) - AOP, Plugin, Sampling (0) | 2022.03.16 |
| AWS S3 객체 업로드 및 권한 설정 - JAVA (0) | 2022.01.04 |
| sam build 에러 (0) | 2021.02.15 |
| AWS Toolkit ( IntelliJ ) 으로 Lambda 로컬 테스트 (0) | 2021.02.09 |
- Total
- Today
- Yesterday
- AWS
- Size
- JPA
- error
- Container
- gradle
- Linux
- Spark
- Index
- tomcat
- intellij
- Kibana
- Java
- install
- spring
- maven
- SpringBoot
- plugin
- elasticsearch
- docker
- scala
- logstash
- mac
- apm
- spring boot
- Filter
- Postman
- Git
- Log
- JSON
| 일 | 월 | 화 | 수 | 목 | 금 | 토 |
|---|---|---|---|---|---|---|
| 1 | 2 | 3 | 4 | 5 | 6 | 7 |
| 8 | 9 | 10 | 11 | 12 | 13 | 14 |
| 15 | 16 | 17 | 18 | 19 | 20 | 21 |
| 22 | 23 | 24 | 25 | 26 | 27 | 28 |
